Monday, December 10, 2012

Error occurred during the processing of . Could not load the assembly


An error occurred during the processing of . Could not load the assembly 'SharePointCodeBehindDemo, Version=1.0.0.0, Culture=neutral, PublicKeyToken=71e9bce111e9429c'. Make sure that it is compiled before accessing the page. 

Solution :
This is the [Namespace].[ClassName],[AssemblyName] syntax that I am assuming you put in the inherit's attribute in your ASPX.

Register an assembly as a safe control in the Web.config file


In order for you to use your own custom assembly with your web parts and other little bits, you will need to add your safe control to the web.config file.  However, you need to think "WEB FARM" with many servers hosting the web application so I will show you a couple ways to do this.

The entry in the web.config

You need to place a SaveControl element entry into the web.config file of the web application.  The entry looks like the following:
   1: <configuration>
   2:   <SharePoint>
   3:     <SafeControls>
   4:       <SafeControl Assembly="[Assembly Name]" Namespace="[Namespace]" TypeName="*" Safe="True" />
   5:     </SafeControls>
   6:   </SharePoint>
   7: </configuration>
Assembly The name of your assembly needs to added to this section. Although you can simply type the name of the DLL hosting the control into the Assembly element, it is important to not that this is not the recommended practice.  Rather, use a full four part name; i.e. [assembly], version=[version], culture=[culture], publickeytoken=[publickeytoken]Namespace The namespace that your web controls are in.  If you have your controls in multiple namespaces, you will need to add one <SafeContol ...> element for each control.TypeName The name of the web control which is allowed to be executed with the SharePoint web application.  Should your namespace have multiple web controls, you do not need to register each control.  You can simply use * (asterisk) to indicate the dll.Safe A boolean flag, indicating whether the control is treated as safe (true) or unsafe (false). AllowRemoteDesignerA boolean flag, indicating whether the control can be loaded by a remote designer, such as SharePoint Designer.
Sample
   1: <SafeControl Assembly="Brett.DemoParts, Version=1.0.0.0, Culture=neutral, PublicKeyToken=f03e5f7a44d50a3a" 
   2:              Namespace="Brett.SharePoint.WebParts" 
   3:              TypeName="*" 
   4:              Safe="True" 
   5:              AllowRemoteDesigner="True" />

Methods of updating the web.config file

There are three ways you can update the web.config file,
  • Manually adding the SafeControl to the web.config
  • Adding the SafeControl to the web.config with code
  • Deploy the assembly using a solution package

Manually editing the web.config (bad)

This approach may sound the easiest and quickest way as you simply open up your favourite xml editor, find the <SafeControls> element and add your own control into it.
WARNING! If you do it this way, you are looking for trouble in a farm as you will need to remember to change the web.config modification for all your servers in the farm as well as all the web applications on the farm that use the custom control.  So should you have a really awsome web part that is used within 5 web applications hosted on your farm of 3 servers, you will need to make the modification to 15 web.config's .. have fun.
Also should you add a new server to your farm, please remember to add the entry the web.config.
Bottom line, this is the worst possible way you can do it  and stay away from doing it this way

Adding the SafeControl to the web.config with code (good)

SharePoint provides a class called SPWebConfigModification which has a set of modification commands in a collection.  These modification commands are applied to the default web.config of the Web Application.  These configuration modification commands will also be added and applied to all servers in a farm.   Finally, should a new server be added to the farm, these modifications will also be applied.
The following code could be added to the FeatureActivated override method in your feature that deploys the web part.
   1: public override void FeatureActivated(SPFeatureReceiverProperties properties) 
   2: {
   3:     // A reference to the features Site Collection
   4:     SPSite site = null;
   5:  
   6:     // Get a reference to the Site Collection of the feature
   7:     if (properties.Feature is SPWeb)
   8:     { site = ((SPWeb)properties.Feature.Parent).Site; }
   9:     else if (properties.Feature.Parent is SPSite)
  10:     { site = properties.Feature.Parent as SPSite; }
  11:  
  12:     if (site != null)
  13:     {
  14:         SPWebApplication webApp = site.WebApplication;
  15:  
  16:         // Create a modification
  17:         SPWebConfigModification mod = new SPWebConfigModification(
  18:             "SafeControl[@Assembly=\"MyAssembly\"][@Namespace=\"My.Namespace\"]"
  19:                 + "[@TypeName=\"*\"][@Safe=\"True\"][@AllowRemoteDesigner=\"True\"]"
  20:             , "/configuration/SharePoint/SafeControls"
  21:             );
  22:  
  23:         // Add the modification to the collection of modifications
  24:         webApp.WebConfigModifications.Add(mod);
  25:  
  26:         // Apply the modification
  27:         webApp.Farm.Services.GetValue<SPWebService>().ApplyWebConfigModifications();
  28:     }
  29: }

Deploy the assembly using a solution package (best)

The preferred way to provision your features, web parts and assemblies is by creating a Solution Package (.wsp file).  You will add add your assembly, the manifest.xml file and all your other components and resources into the cabinet.
You will need to add the following entry into the manifest.xml
   1: <Solution SolutionId="{1E0FDA58-6611-423a-92EC-8E7355810CEE}"
   2:           xmlns="http://schemas.microsoft.com/sharepoint/">
   3:   <FeatureManifests  />
   4:   <ApplicationResourceFiles />
   5:   <CodeAccessSecurity />
   6:   <DwpFiles />
   7:   <Resources />
   8:   <RootFiles />
   9:   <SiteDefinitionManifests />
  10:   <TemplateFiles />
  11:   
  12:    <Assemblies>
  13:       <Assembly DeploymentTarget="WebApplication" Location="Brett.DemoParts.dll">
  14:          <SafeControls>
  15:             <SafeControl Assembly="Brett.DemoParts, Version=1.0.0.0, Culture=neutral, PublicKeyToken=f03e5f7a44d50a3a"
  16:                          Namespace="LitwareWebParts" 
  17:                          TypeName="*" 
  18:                          Safe="True"                         
  19:                          />
  20:          </SafeControls>
  21:       </Assembly>
  22:    </Assemblies>
  23: </Solution>
  24:  
Key highlights
DeploymentTarget The depoloyment target is location where the assembly will be copied to and can ether be the bin folder of the WebApplication or it could be the GlobalAssemblyCache (GAC)Location The location of the assembly within the cabinet file. SafeControl A SafeControl element entry as described at the beginning of the post.   
Using this method, your assembly will be correctly deployed the servers in the farm as well as added to the safe controls of the web application.  Again any new server added to the farm will automatically get all the solution packages deployed.

Creating Multicolumn SharePoint 2010 Field Types


Summary:  Learn how to work with multicolumn values when creating custom field types in Microsoft SharePoint 2010 to track two or more pieces of data that represent one logical piece of information.
Applies to:  Microsoft SharePoint Foundation 2010 | Microsoft SharePoint Server 2010 | Microsoft Visual Studio 2010


Using ASCX in WebParts and UserControls in SharePoint


In order to get around the issue of not being able to have pages with code behind in them, I have been using User Controls. Over the years I have adopted one way of developing web parts and user controls for which the code lives in DLLs but the layout still exists in ascx files. This may not be the only or best way to accomplish this but it is a way that has always worked for me.

On many of my assignments I receive HTML from a web designer and my job is to implement the functionality. I like working this way. As long as I ensure that the HTML my code ends up rendering is the same as the HTML the designer delivered in her static page, I know the page will look great. This means I usually start by taking the HTML and translating it into ASP controls.

So for example I may receive the following snippet from the designer:

<ul>
    <li>Item 1</li>
    <li>Item 2</li>
</ul>


I know that item 1 and item 2 are just an example, and the values here will need to dynamically come from a SharePoint list for instance. So I translate this to a repeater (my favourite ASP.NET cotnrol):

<asp:Repeater ID="MyRepeater" runat="server">
    <HeaderTemplate>
        <ul>
    </HeaderTemplate>
    <ItemTemplate>
        <li><asp:Literal ID="litItemValue" runat="server"></asp:Literal></li>
    </ItemTemplate>
    <FooterTemplate>
        </ul>
    </FooterTemplate>
</asp:Repeater>


This way I know that the rendered HTML will be exactly what the designer intended and thus the page rendering will not be broken.

Now that I have the ascx ready, I want to use it in a user control or a web part. My next step then is to create a class in a Class library and have this class dynamically load the ascx into a user control object. I do this by calling the Page.LoadControl() method as seen in this code:

public class MyWebPart : WebPart
    {
        private const string ControlPath = "/_controltemplates/MyApplication/";

        private UserControl myControl;
        private Repeater myRepeater;

        protected override void CreateChildControls()
        {
            base.CreateChildControls();

            myControl = (UserControl)Page.LoadControl(ControlPath + "MyControl.ascx");
            Controls.Add(myControl);

            myRepeater = (Repeater)myControl.FindControl("MyRepeater");
        }

        protected override void OnLoad(EventArgs e)
        {
            base.OnLoad(e);
            EnsureChildControls();

            myRepeater.ItemDataBound += new RepeaterItemEventHandler(myRepeater_ItemDataBound);
            myRepeater.DataSource = GetData();
            myRepeater.DataBind();
        }

        private object GetData()
        {
            // create a proper data source here
            object myReturnValue = new object();
            return myReturnValue;
        }

        void myRepeater_ItemDataBound(object sender, RepeaterItemEventArgs e)
        {
            // do your stuff here
        }
    }


The Page.LoadControl is the crucial part, but there are a few other bits that I'd like to explain here.

First there is the issue of the path that the control is being loaded from. This path is a virtual directory path, and I like to use the already existing virtual directory created by MOSS called _controltemplates. Seems like the right place to put control templates. Just to keep things neat I like to have a folder here for each application. Note that this virtual directory corresponds to the physical directory {Location of 14 Hive}\TEMPLATE\CONTROLTEMPLATES on your MOSS server(s) so if you place you controls here, things will work. I like to deploy my control templates using MOSS solution files but that's another post.

The second thing to note is that you have to add the UserControl object to the this.Controls collection. If you forget this, your web part will not render anything and you may get null reference exceptions.

Third, make sure you get the ID correct when using the FindControl method. Doing the lookup based on a string ID works fine, but if you have the wrong ID in here you will not know until you get a nasty null reference exception at runtime.

Last, remember to call the EnsureChildControls() before you start using any of the controls in your template. Otherwise you may get yet another null reference exception.

To get this all finally working, build your class library, register is as safe in the web.config file and add it to the bin folder of the MOSS application or the GAC. You should then be able to use your web part or user control.

Lookup in Lists Programatically


some times lookup column doesn't work , i spent long time and finally i  tried this chunk of code and looku work fine .

when using visual studio take care when write atteibute of lookup
field being in this order

<Field ID="c290b4ee-5c63-4dd7-b31c-f5252770c507"         Type="Lookup"         DisplayName="Company Name"         List="Lists/Companies"         Overwrite="TRUE"         PrependId="TRUE"         Required="TRUE"         Hidden="FALSE"         ShowField="Title"         EnforceUniqueValues="FALSE"         UnlimitedLengthInDocumentLibrary="FALSE"         SourceID="~sitecollection"         WebId="~sitecollection"         StaticName="CompanyName"         Name="CompanyName"         Group="Rashpetco Columns" />


===============================
Note ID without curly brackets

Force Delete Specific List


if you retract your solutin and some lists doesn't deleted  try to force delete it by using powershell command :

Get-SPWeb “YourSiteURL” | % {$_.Lists.Delete([System.Guid]$_.Lists["YourListName"].ID)}

Error : Both 'CustomDocuments' and 'CustomDocuments' contain a file that deploys to the same Package location


Deploys to the same Package location" error
by  SP2010\Administrator  on 6/1/2010 1:00 PM
Category: Troubleshooting
If I'm frequently copying, pasting, and deleting SharePoint items from my Visual Studio 2010 project, I can sometimes confuse Visual Studio. When this happens, I try to deploy my solution package and I get an error like

Both 'CustomDocuments' and 'CustomDocuments' contain a file that deploys to the same Package location: CustomDocumentsListInstance\CustomDocuments\Elements.xml

This is confusing since I only see one file listed. Why is it saying the same item is trying to deploy to the same location, as if it were two different files? Turns out that when you add an item to a SharePoint item (sucn as a module, list definition, list instance, etc.) it adds a reference to it to the .spdata file in that folder. (If you can't see the spdata file, click on the "Show all files" button in the toolbar of your Solution Explorer.) You'll most likely find duplicate entries in there, or the wrong folder name if you changed the folder name to something else. Make your changes to the spdata item and your solution should package properly.

Add item in document library of spcific ContentType


SomeTimes you need to add item of type folder in Document Library Programatically and in this time you sould use SPFiles or you can add it as folder iten

Here is snapshots of code .....


 SPContentType mCType = InvoiceList.ContentTypes["YourCT"];                       
 SPFolder newFolder = InvoiceList.RootFolder.SubFolders.Add("yourFolderName") ;        newFolder.Item.SystemUpdate();   newFolder.Update();   newFolder.Item[SPBuiltInFieldId.ContentTypeId] = mCType.Id;
                       
 newFolder.Item["YourField"] = InvoiceAmountList[i];                     
 newFolder.Item.SystemUpdate();  InvoiceList.Update();  web.Update();

how to use SharePoint's GridView

Sometimes while building WebParts or Application Pages, it is needed to display data using a grid, such as with ASP.NET's GridView control. Fortunately SharePoint has its own implementation: SPGridView, which we can use, as explained in the five samples shown below.

read more >>>

Sunday, December 9, 2012

how to export gridview data to CSV file or Export Gridview data to CSV file using asp.net

Introduction: 

Here I will explain how to export gridview data to CSV or text document using asp.net.


Description:

I have one gridview that has filled with user details now I need to export gridview data to CSV file or text file. First we need to learn what is CSV file? CSV file is a text based file in which data are separated by comma and it can be opened by Excel. Each row of data in CSV file separated with commas.

To implement this functionality first we need to design aspx page like this 


<html xmlns="http://www.w3.org/1999/xhtml">
<head id="Head1" runat="server">
<title></title>
</head>
<body>
<form id="form1" runat="server">
<div>
<table>
<tr>
<td align="right">
<asp:ImageButton ID="btnCSV" runat="server" ImageUrl="~/CSVImage.jpg"
onclick="btnCSV_Click" />
</td>
</tr>
<tr>
<td>
<asp:GridView runat="server" ID="gvdetails" DataSourceID="dsdetails"  AllowPaging="true"AllowSorting="true" AutoGenerateColumns="false">
<RowStyle BackColor="#EFF3FB" />
<FooterStyle BackColor="#507CD1" Font-Bold="True" ForeColor="White" />
<PagerStyle BackColor="#2461BF" ForeColor="White" HorizontalAlign="Center" />
<HeaderStyle BackColor="#507CD1" Font-Bold="True" ForeColor="White" />
<AlternatingRowStyle BackColor="White" />
<Columns>
<asp:BoundField DataField="UserId" HeaderText="UserId" />
<asp:BoundField DataField="UserName" HeaderText="UserName" />
<asp:BoundField DataField="LastName" HeaderText="LastName" />
<asp:BoundField DataField="Location" HeaderText="Location" />
</Columns>
</asp:GridView>
</td>
</tr>
</table>
<asp:SqlDataSource ID="dsdetails" runat="server"ConnectionString="<%$ConnectionStrings:dbconnection %>"
SelectCommand="select * from UserInformation"/>
</div>
</form>
</body>
</html>
Here don’t forgot to set the connection string in web.config file here I am getting database connection from web.config file for that reason you need to set the connectionstring in web.config file like this 

<connectionStrings>
<add name="dbconnection" connectionString="Data Source=SureshDasari;Integrated Security=true;Initial Catalog=MySampleDB"/>
</connectionStrings>
After set the connection string in web.config file now we are able to get the data from database and we can bind that data to gridview by using sqldatasource. Now if you run application gridview appears like this


Now in code behind add this reference

using System.IO;
After that write the following code in code behind

public override void VerifyRenderingInServerForm(Control control)
{
/* Verifies that the control is rendered */
}
/// <summary>
/// This event is used to export gridview data to CSV document
/// </summary>
/// <param name="sender"></param>
/// <param name="e"></param>
protected void btnCSV_Click(object sender, ImageClickEventArgs e)
{
Response.ClearContent();
Response.AddHeader("content-disposition"string.Format("attachment; filename={0}","Customers.csv"));
Response.ContentType = "application/text";
gvdetails.AllowPaging = false;
gvdetails.DataBind();
StringBuilder strbldr = new StringBuilder();
for (int i = 0; i < gvdetails.Columns.Count; i++)
{
//separting header columns text with comma operator
strbldr.Append(gvdetails.Columns[i].HeaderText + ',');
}
//appending new line for gridview header row
strbldr.Append("\n");
for (int j = 0; j < gvdetails.Rows.Count; j++)
{
for (int k = 0; k < gvdetails.Columns.Count; k++)
{
//separating gridview columns with comma
strbldr.Append(gvdetails.Rows[j].Cells[k].Text + ',');
}
//appending new line for gridview rows
strbldr.Append("\n");
}
Response.Write(strbldr.ToString());
Response.End();
}

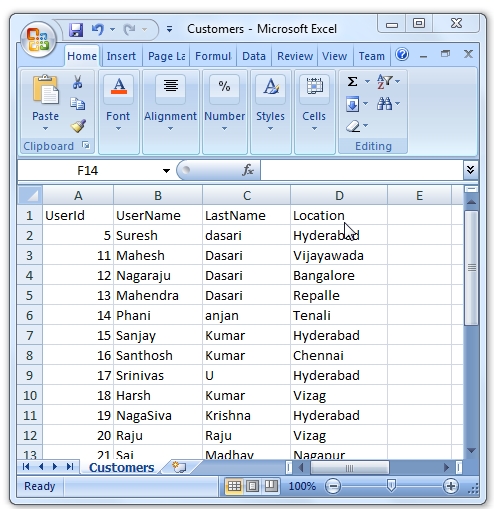
Demo for CSV document


If you observe above code I added one function that is VerifyRenderingInServerForm this function is used to avoid the error like “control must be placed in inside of form tag”. If we setVerifyRenderingInServerForm function then compiler will think that controls rendered before exporting and our functionality will work perfectly